Monday, August 19, 2019

Setting up the Olympus TG-6 Camera with a Kraken Ringlight 3000 for Underwater Photography

The Olympus TG-6 camera paired with the Kraken Ringlight 3000 is a great compact set-up for shooting macro without the added weight and bulk of a tray, arms and strobes. The Ringlight 3000 can function as a continuous light source (up to 1800 lumens), or as a focus light with 3000 lumen burst capabilities. While using the Ringlight in continuous light mode, the camera automatically adjusts the exposure to the light output. This means that you don’t have to worry about under or overexposing your images.  However, when shooting in burst mode, there are some additional considerations and settings we recommend for getting well exposed images and make the most out of this compact set-up.

General Camera Settings:
  • In the Menu options, scroll to Custom Menu, under “C” select Exposure Shift and choose spot (center) metering. The use of spot metering and spot auto focus is important for best results. Then scroll through the options and select -1.
Program Mode and Microscope Mode:
  • Scroll through the right-hand side Settings options and set the ISO to 100, the flash to Fill Flash, and the exposure metering to Spot (Center).
  • Adjust the exposure compensation (+/-) to achieve desired exposure (typically -2).
  • Note: The Ringlight’s 1800 lumens continuous light is bright enough to for super macro photography. Burst mode can be used but is not necessary in Microscope mode as subjects are typically only few inches/centimeters or less from the light source.
Aperture Priority Mode:
  • Preset exposure compensation to -2 in P mode before changing to A mode.
  • Once in A mode, scroll through the right-hand side Settings options and set the ISO to 100, the flash to Fill Flash, and the exposure metering to Spot (Center).
  • Adjust aperture to achieve desired depth of field.

Modes not recommended for use with burst mode on Kraken Ringlight 3000.

  • These modes are as follows: Auto, Underwater Macro and Underwater Microscope. When using Auto it is recommended to use only the continuous light emitted from the Ringlight because this mode only has Auto or No flash options to adjust.  Additionally, the Underwater Modes are geared towards naturally lit images that need some color adjustment to bring back the warm tones lost at depth. It is not necessary to use these modes when lighting with strobes or video lights on closeup macro imaging as there is no cyan cast.
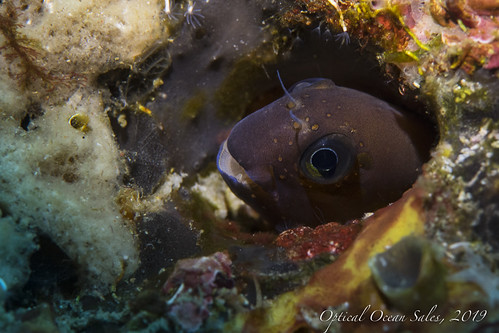
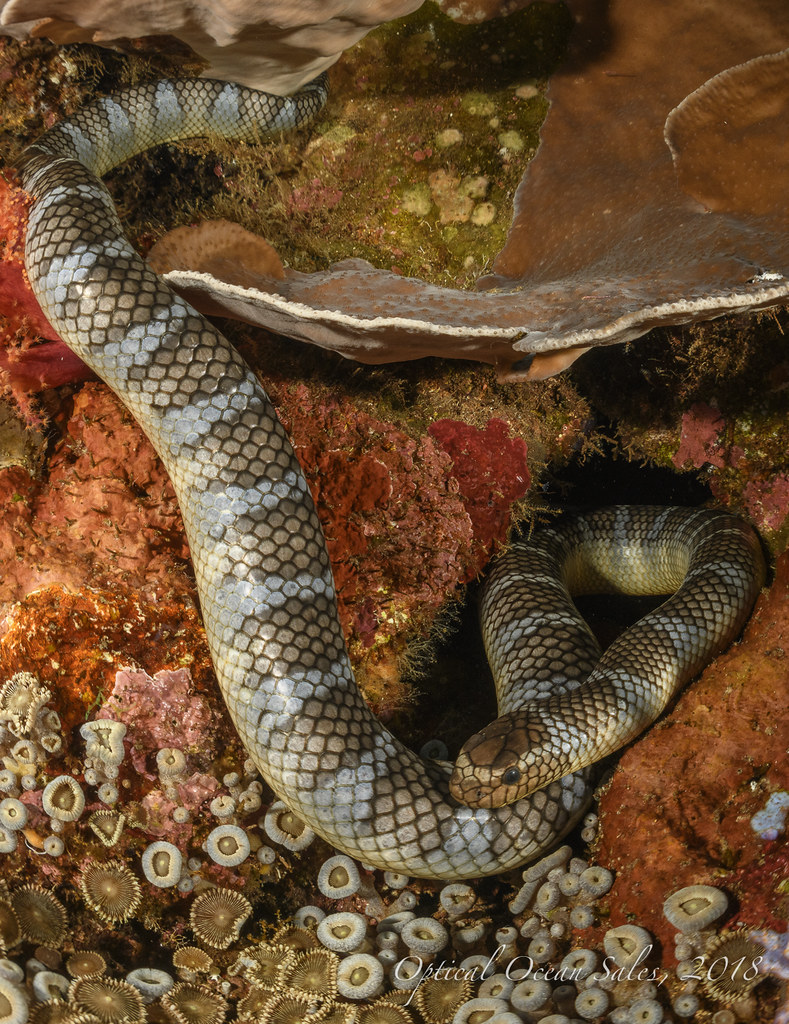
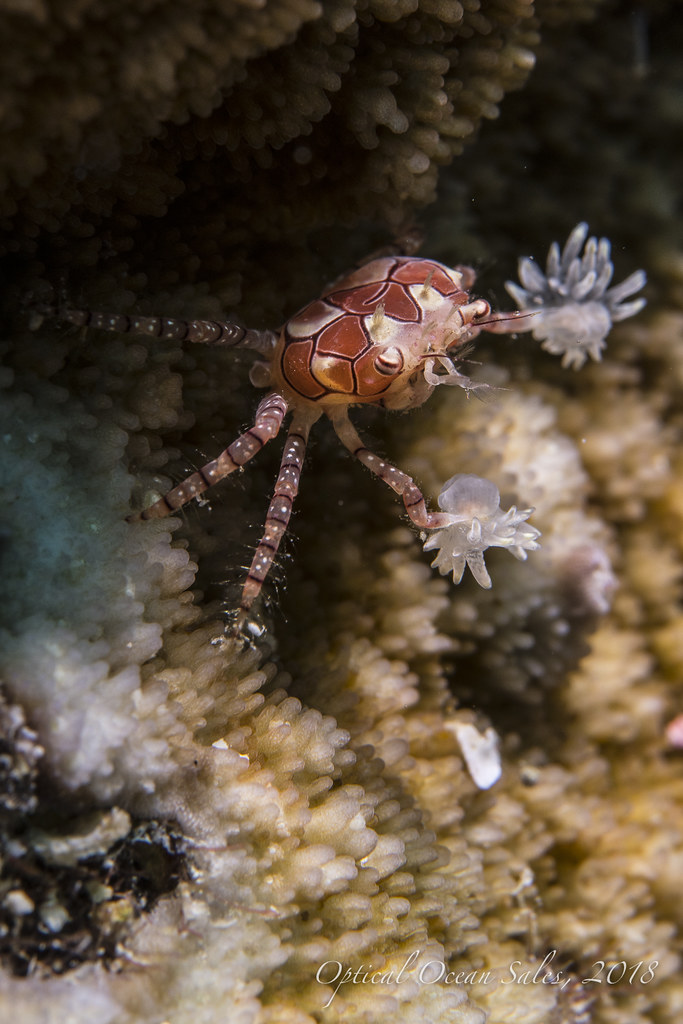
  • Aperture Priority Mode
    Using the minimum aperture allowed and exposure compensation at -2 and with the camera about 7 inches away from the subject. Zoomed in to 100mm the camera's the minimum aperture is f/4.9. All minimum apertures resulted in acceptable image exposure. Changing the aperture to f/6.8 and f/18 while zoomed in to 100mm did not change the exposure of the images drastically.

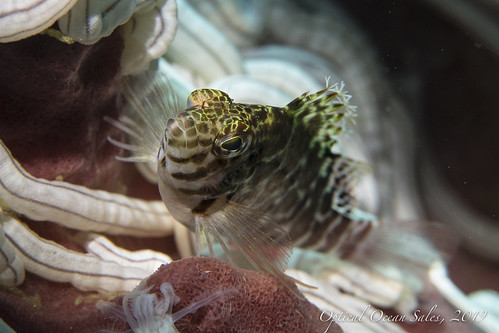
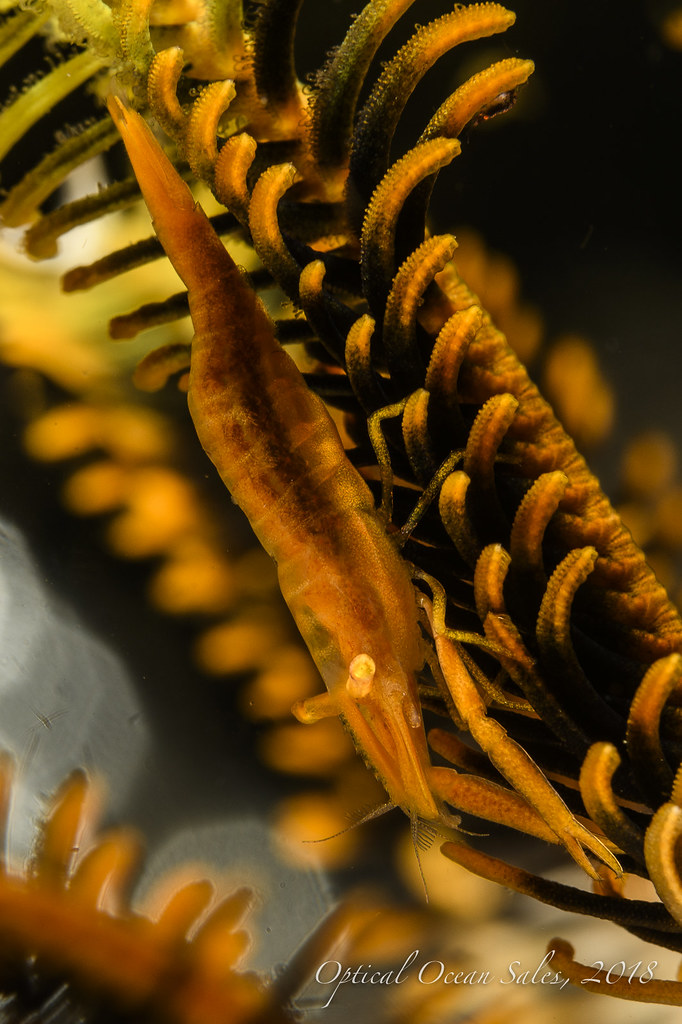
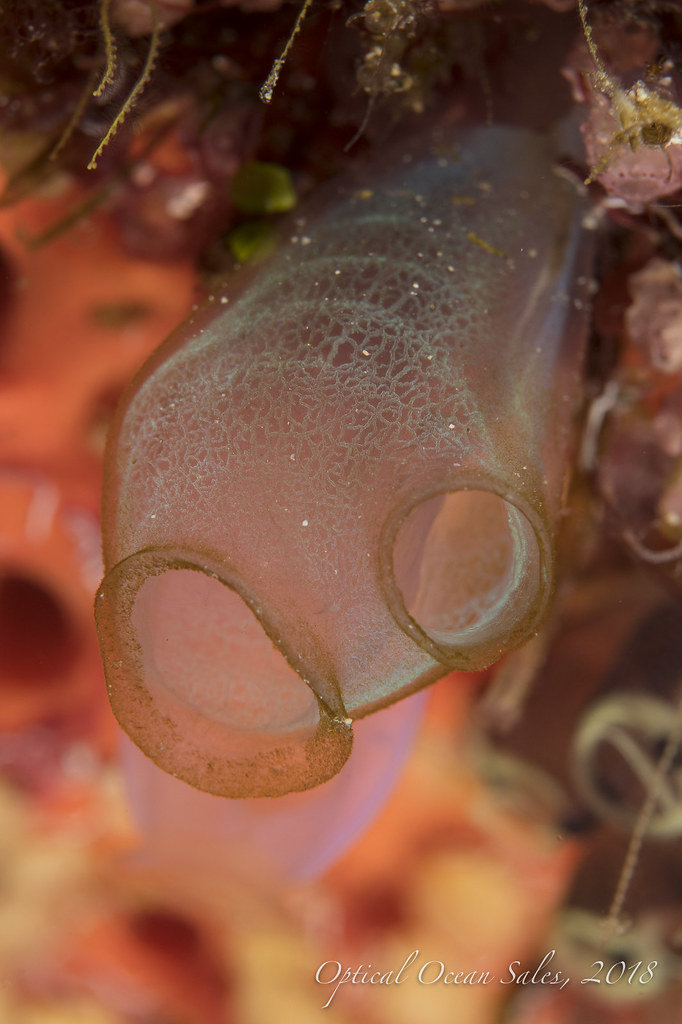
    Microscopic Mode
    Photo taken from a few inches away to less an inch from the subject using the recommended settings resulted in well exposed images. 

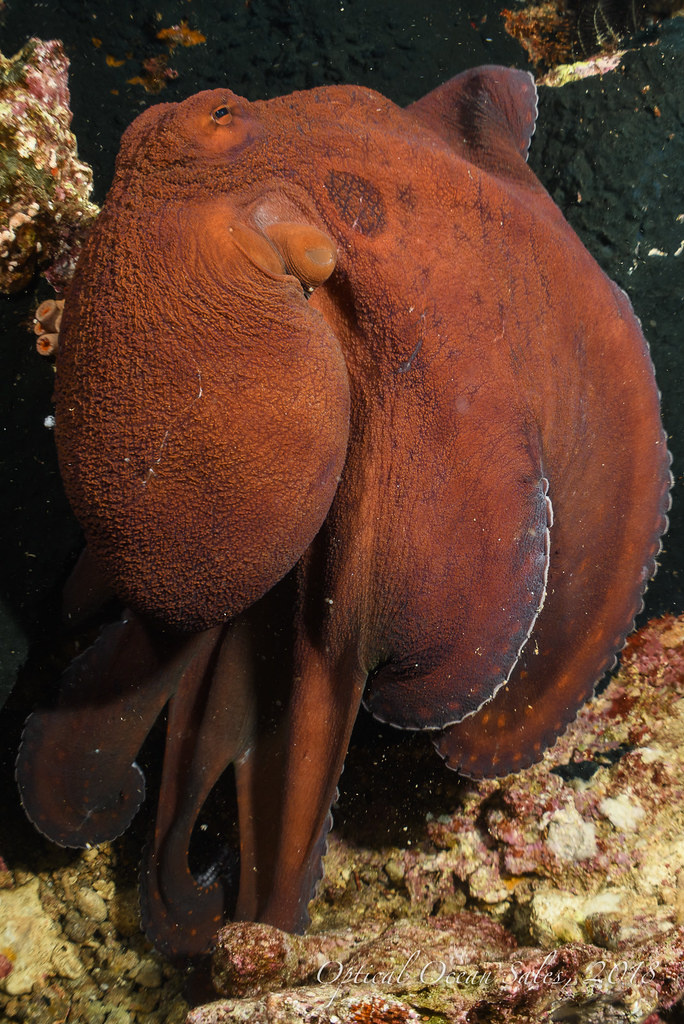
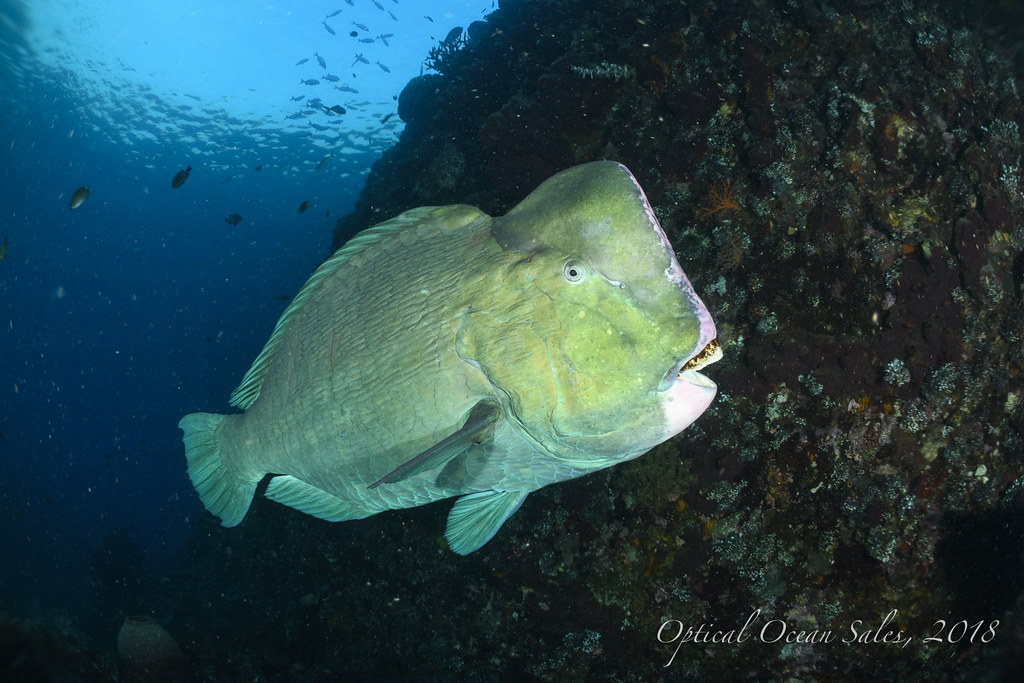
    Program Mode
    Photo taken in Program Mode using exposure compensation at -2 and with the camera about 7 inches away from the subject. If the shots are too dark, then exposure compensation could be changed from -2 to achieve the desired exposure.

Monday, July 29, 2019

Compare the Difference!

At Optical Ocean Sales we believe in proving the best shopping experience for you by providing all the information you need to buy the right product to suit your underwater photo and video needs.

We’ve been working hard to add specs and information of the features of items that we sell, and have them available for in an industry-leading comparison format. No other store does this!

How to Find Product Features

You can access individual Product Features from the tab on the product page. No surprise there, but you’ll find that we have researched and listed much more in-depth information than you’ll find elsewhere! All the specifications we could access for the products, such as size, weight, buoyancy, batteries, charge and burn time, depth rating and more. We’ve also listed suggested options, operational guidelines and capabilities, accessories and other pertinent information.

How to Compare Product Features

Where all this information really becomes an important purchase tool is by using our Product Comparison page. Here you will show selected products’ features side-by-side and be able to see their differences and similarities and compare them - as well as see their prices.

You can access this at the press of a button - the little “graph” icon is your friend! You can see this icon on each product in several places to add it to your list to compare.

On the Category Page - simply hover your mouse over a product. On the upper righthand corner three icons appear. The top “eyeball” is a quick product view, the second one is to add the product to a “wishlist” for future reference, and the last is the “graph” icon to add the product to the comparison page.

On the Product Page - located on the tan bar under the short product description you’ll also see the wishlist and graph icon.

Select as many products as you’d like to compare, then press the “Comparison Page” button from the dialog box. You’ll be taken to a page with all the sections laid out vertically and their features horizontally. This makes it easy to compare, for instance, the beam angle, lumen output, buoyancy or any other fact of the lights you’re thinking about. Or the weight of various housings and their depth rating. Does this strobe offer TTL? Recharge times? How does it compare to it’s less expensive neighbors? Now you can find out!

Still Stuck? Don’t Understand a Specification?

Try consulting our easy-to-read Handbooks, or the manufacturer’s sites for more information. Or just send us an email or give us a call at 800-359-1295, we’re happy to help you with our recommendations for on your intended use.

Please note:
All specifications and features were derived from the products’ manufacturers. Your experience may vary. We have tried to be as accurate as we could and converted weights and sizes as necessary for comparison. We are not responsible for any product changes, but will update as much as possible.

Wednesday, July 17, 2019

Olympus TG-6 First Impressions


By Jim Lyle

I was able to get my hands on both an Olympus TG-6 camera and PT-059 underwater housing from Optical Ocean Sales fast and at a great price despite a backlog of orders from other vendors. Of course, with a new toy, I wanted to play with it as soon as possible.

The Olympus TG6 is the newest camera in the Oly Tough series. Waterproof without to a depth of 50 feet it’s still advisable to use an underwater housing such as the Olympus PT-059.

Here in southern California, we’ve had crappy conditions for several months this spring - lousy visibility, large swells, and strong winds. Last weekend looked like a window of opportunity so I put my rig together and complete two dives off of Redondo Beach to test out the new camera. Beneath the thermocline the water was dark, but with good visibility.

So far, with only two dives on the camera, I’m impressed with the results.

I used dual Sea & Sea YS-D1 strobes set on TTL and shot both normal and macro subjects. The results were wonderful as you can see in the following images.

One improvement over the older TG5 is the ability to shoot macro AF in Aperture mode. In fact, you can pretty much leave the camera in A mode and never have to touch the mode dial. (There are two custom modes C1 and C2 that can be preset if you so desire.)

I’m off to warm, clear water in a couple of weeks and plan on further testing of this great little camera. I’ll report back when I get home.


Wednesday, May 22, 2019

Review: Big Blue CB15000P 15,000 Lumen COB Light


Want to Light up a Whale?

Can a single very powerful continuous underwater video light work well for stills of large animals? As the quality and output of video lights have increased, I’ve been asking myself that question.

We know that many continuous lights can work fine for macro and closer up images, although they tend to give a softer look than strobes. Strobes output a single, very high and very short energy burst of light at high intensity, this freezes detail and gives better color saturation. Lights simply can’t to do that as well. But many still photographers find that they do work well, especially when shooting both video and more casual stills.

On our recent OOS Triton Bay to Raja Ampat trip we had several opportunities to photograph whale sharks being fed. Unfortunately, the visibility wasn’t that good. The first time we shot them, I was frustrated by the amount of backscatter I got in my photos from the strobes I was using. We were near the surface and I really only wanted some fill on them anyway. Also, we were doing a lot of swimming to position ourselves - our dive profiles looked like an EKG!

Big Blue CB15000P Video Light

These new series of COB lights feature a single Chip on Board (COB) LED emitter that gives a very wide, smooth very powerful beam. The Big Blue CB15000P outputs an amazing 160° beam with a warm 5000K color temperature. They also come in smaller 6500 and 9000 lumen sizes.
I added it to my Nauticam D850 along with a single Nauticam Float arm (72220). The light only weighs about a pound in the water. With a handstrap on the camera, it was much smaller and easier to handle, than a dual arm strobe rig. This was especially nice as I was free diving on the second dive.

I was very pleased with the quality and amount of light the single Big Blue light put out. I was afraid of having a shadow from only having one light. However, I was able to center the light over the port and by tilting it up, eliminate most of the backscatter (much of the rest was left over sardines the sharks were munching). It’s unusual to be able to position the light in that manner with heavy “smutz” in the water, but the extra wide beam of the light made it easy.

Then I just went for it and concentrated on shooting. I could also use the motor drive of the camera, that’s normally not an option with strobes. So, for fast action diving it made for an easy way to handle lighting.

I think the results were much better than when I used strobes in this situation, it was a good adjunct that balanced well with the available light and created little backscatter.

One funny result was that the whale sharks seemed to like the high intensity light and were very curious, swimming right at me, nose on, many times. It didn’t seem to faze them at all!

The light ran easily for an hour on high, maybe longer, it had plenty of life left in it afterwards, both on that dive, and on a subsequent dive when I used SCUBA. I think you could get two dives out of it. There is a colored light indicator power button to show the remaining charge.

The CB15000P light uses a large rechargeable battery pack. It takes a while to recharge, maybe 2-3 hours or so, so if you’re doing multiple dives, either lower the light power by using one of the four settings when you’re not shooting or bring along a spare battery pack.

About the only quibble I have with the light is the internal battery connection. It’s rather bulky to connect and get aligned so that everything fits inside the case. It also seems like the wires might get pinched over time. More thought towards a better module pin connector would be an improvement.

The Big Blue CB15000P comes in a nice hard case along with the charger and a ball mount.

For blue water and larger animal photography, I think the Big Blue CB15000P is a good approach to try.

Monday, April 15, 2019

Kraken Macro Snoot Light Review


Shining a ray of light on this new small light.

Kraken’s new Macro Snoot Light is an easy way to get into the use of directed light for underwater macro photography.
Snooting refers to the control of light through a cone, or light shaper, so that it’s used as just a small beam for more dramatic, lighting solutions. In studio lighting photographers use all sorts of shoots, barn doors, grates and more to achieve interesting light qualities.

It’s been very popular for some time in underwater photography to use snoots on strobes that can be aimed, and made larger, smaller, or even shaped. Products such as the 10Bar Laser-aimed Snoot, or the Retra Light Haping Device have quite a bit of creative flexibility built into them.

However, these are fairly long and bulky on the end of a strobe to use, travel with, and are more expensive. It also takes quite bit of time to acquire the subject, aim the snooted strobe, adjust exposure and take the shot you want.

Kraken’s new Macro Snoot Light is small and lightweight. It comes in a bag with a rechargeable battery that you can just plug in to recharge - no external charger is necessary. Like all Kraken lights, it has robust construction and is double oring sealed.

I tried this macro light out on the recent OOS Photo Expedition to Raja Ampat. Most people who shoot snooted photos set up on a rubbly bottom to shoot nudibranchs or other small subjects that don’t move around too quickly. It can be a bit frustrating to get everything all lined up!

Misool in Raja Ampat, with its rich reefs and walls doesn’t have many of those types of photo opportunities. So I decided to use the Macro Snoot Light on a couple of short arms off a ball mount on my Nauticam D850 housing and just swim it around on a wall dive. This made for a very compact and easy-to-dive-with macro lighting system that’s pretty versatile.

As the light is a “constant on” light, you can see exactly what your shots will look like. The main difference with using the snoot light over a strobe, is that you are shooting with ambient light. You’ll need darker areas to shoot, with a higher ISO and overall exposure. The light from it doesn’t flash at high speed and amplitude like a strobe to freeze action, so shots will have a softer look to them, and the colors less saturated.

But this can give you some nice, soft lighting and shots with a much different feel, that are really more emotional looking. This contrasts nicely with brightly lit macro shots.

The Kraken Macro Snoot Light comes with a small, round “light limiter” that puts out a very tiny section of it’s 400 lumen light. If you were shooting with high magnification, this might work out well, but it would take holding it off to the side on a small tripod and locking down the setup to shoot it. I quickly decided to use just the light with no limiter and with my Nikon 105VR lens and a +5 diopter to make it easier. The light itself has a small focusing lens on it that casts a larger beam that’s soft and yet limited, sort of a small slightly rectangular beam.

To dive on the wall in some current, I pre-aimed it at some small invertebrates so that when I was at the focus distance of the lens the light was aimed correctly on that same area. Then I could just swim along, find something to shoot and only have to do a small bit of adjusting. I ended up shooting at 1000 ISO at f/20-22 and still could shoot at 1/125th of a sec to freeze the shots. I just adjusted the aperture, let the rest alone, and made slight movements of the light to change my exposure on lighter or darker subjects. I was thus able to shoot quite a few different subjects, unlike other times with a snoot on a strobe that might take 10 mins or so to set up.

I was pleased with the results and got some shots I wouldn’t of gotten otherwise with a strobe. I ended up with darker foreground and backgrounds with the light right on the subject to isolate it from busier backgrounds.

I think the Kraken Macro Snoot Light is a nice small addition to a DSLR travel kit and would also be a nice way for compact camera photographers to use a lightweight solution to get into snoot photography on a budget.

Tuesday, February 26, 2019

Gone But Not Forgotten

Forgotten Islands/Banda Sea Photo Expedition, November 4-15, 2018

Stories don't have a middle or an end any more.
They usually have a beginning that never stops beginning. 
— Steven Speilberg
After a few great days of diving at Tulamben on Bali, I joined up with the rest of the Optical Ocean Sales guests up in Ambon, Indonesia. The 12 of us joined the Damai 1 the next morning and settled into our comfortable cabins onboard. We were headed for Maumere on Flores Island - 1,000 nautical miles away, clear across the Banda Sea which lies lies between Raja Ampat in the north and Komodo National Park to the south. Over the next ten days, we would do 35 dives at some of the most remote sites anyone can imagine. Islands, walls, sea mounts, volcanos, reefs and muck - we would dive them all.

We did two brief dives in Ambon and were treated with a couple of Rhinopias, nudis and other great life there. That night would be the first of many long passages we’d have, crossings taking anywhere from 9 to 14 hours. This would also be one of the few rough nights at sea, for most of the trip it was beautiful weather with glassy seas and no rain, unusual in the tropics. We did four dives at Nusa Laut and were treated to a huge school of Jacks along its sloping walls on a couple of dives.

The next day was a treat, as we were near Banda Island with lots of site choices. The clear winner was Suanggi Pinnacle, which was a fairly large sea mount, probably left over from a volcano. The north wall is steeper and over two days we’d do two dives there and one on the south wall, which was more sloping. A kaleidoscope of different sized fish made seeing the actual reef almost impossible at times. We had glimpses of shy Hammerhead sharks - as we would on and off thoughout our time in the Banda Sea. While we did see other liveaboards, there was always lots of choices of dive sites and the boats cooperated with each other to ensure a good time was had.

We spent the night quietly at anchor in the harbor at Banda Neira. Banda was the heart of the Dutch East Indies, aka “Spice Islands” dating back to the 1600s. Nutmeg, mace, cinnamon and many other spices remained a heavily guarded crop by the Dutch. Native Indonesians were made to work as slaves and an uprising resulted in hundreds being killed and the establishment of a fort by the Dutch, which we toured, along with a nutmeg plantation.

Friday, February 15, 2019

Review: Nauticam MWL Wet Wide Angle Lens

Nauticam's innovative new MWL-1 is a game-changing wet mount wide angle lens. Designed to be used in front of a housed macro lens, it allows for an approximate 150° field of view with excellent sharpness and quality.

Using a specialized double lens flip holder, you can now switch to three lens lengths; shooting close-up macro with a diopter, shooting standard macro with the 60mm lens or a moderate fish portrait type shots), or a wide angle lens with a 150º field of view.

The lens is compatible with FX and some APS-C DSLRs, Mirrorless, Compact,  MFT, 1" sensor compacts (see lens chart). Nauticam is continuing to test and add more lenses. The MWL-1 allows for focusing from infinity all the way to the front element, so it’s quite good for CF/WA shots. The ability to shoot wide angle and macro on the same dive is now a reality - even for full-frame DSLR systems!

I took one of these new Nauticam MWL-1 lenses for my Nauticam NA-D850 housing rig with me on our recent Optical Ocean Sales Forgotten Islands Photo Expedition to Indonesia and I'm very impressed with the results.

MWL Lens: The lens comes in a zipped and padded soft case and includes the Nauticam bayonet attachment, including male and female parts. The MWL is fairly small with an integrated lens hood. The hood can be rotated as necessary for alignment. As the optics are high-quality glass, the lens isn’t light and weighs 2.6 pounds out of water and about 1.25 pounds underwater. A small flat port for the required camera lens is all that’s needed to add it to your rig. No extensions, zoom gears or other parts are necessary.

This is the real hidden beauty of the MWL - its small size for travel and diving. It can replace a large 9” glass dome port, 90mm extension, zoom gear and large camera lens! This makes traveling with a large FX underwater rig much easier.

Setup: The lens couples with a macro lens, in the case of the Nikon FX cameras - the AF-S 60mm macro lens. The MWL, and a flip mount with a diopter is fairly heavy and is a bit of a challenge to get neutral.  On my NA-D850 (with lighting) I added about 5 pounds of flotation to and it became more reasonable to work with, if still a little negative. There is not a flotation colar yet available for it, so a Stix float belt worked pretty well.

Usage: I had a number of lenses at my disposal for the trip; my favorite Sigma 15mm FE, Nikon 16-35mm, a borrowed Nikon 8-15mm FE, and the new MWL. For macro, I had the standard FX 105mm VR lens and the AF-S 60mm macro to couple with the MWL. I mostly used a SagaDive +10 diopter with the 60mm as I like it’s small size and power.

The MWL handles well in the water, and the coverage is quite wide at about 150° (depending on the camera and lens used with it). It does get a little long and a bit bulky with the added flip holder, floats, diopter etc. But it’s easy to get used to and it certainly is no bulkier than a large domed lens. Having a little longer port and lens meant that I could also move my strobes forward a bit. As it is a small dome lens, sun flare was easily controllable, if existent at all, and sunballs are fairly easy to shoot.

The new Nauticam flip holders designed for it must be used, as the older flip holders aren’t strong enough to handle its weight. They are a bit stiff and I sometimes had to hold the rig against myself to flip the lens up or down.

It also focuses down to its very small dome for CF/WA. It's easy to shoot big animals, or flip over to a macro diopter for tiny subjects. This opens up a great opportunity to tell a story, creating a series of photos with different points of view.

The lens does need to be stopped down to get the best performance. Nauticam recommends f/16 and after some testing, I agree with that parameter. You could cheat it a bit to F/14, but the shots soften quickly with the high resolution D850 below that.

Comparing it to the Nikon 16-35mm, the 16-35mm lens with the S&S focus diopter allows shots to be taken easily to f/11-f/13 range. I actually find the NA-D850 to be well-balanced with a 9” glass dome and extension in the water, with only a small amount of floatation necessary. Split shots also work great with a large dome and the 16-35mm.

I will still pack a fisheye lens such as the Sigma 15mm FE, or Nikon 8-15mm FE along with a small Nauticam 140mm dome port, as I still want that super wide lens in my arsenal.

DX Mode on an FX Camera for Macro: A 46MP image allows for a lot of cropping, and the creamy dynamic range is great. But I’ve struggled a bit with depth of field using the Nikon 105mm VR lens. I’ve had to either approach my subjects from a flat angle, so that they weren’t foreshortened, or stop way down to f/29 (past normal diffraction sharpness settings) to get enough depth of field. I wasn’t always that happy with the resulting sharpness, or lack of depth of field.

So I decided to put the D850 in DX mode and use it that way with the a macro diopter wet lens. This got me back to a very comfortable, and sharp, f/14-f/16 aperture range on the lens with greater depth of field. It’s not just a cropped image, the optics of the cropped sensor allow for more depth of field at the cost of a smaller image size.

While I don’t have a super large 46MP image, I do have a 26MP image with greater depth of field and sharpness. Which I think is a good tradeoff. I like the larger viewfinder on the D850 in DX mode as you can see beyond the image edges for framing.

It’s a nice way to use the MWL lens setup and gives you another gear to shift for macro shots. Obviously you wouldn’t want to shoot the MWL lens in DX cropped mode as you would undo most of the benefit of the wide angle field of view.

Conclusion

The Nauticam MWL wide angle lens is a versatile and compact solution to the vexing problem of housing a mid-range lens without having to carry a large dome port. It shoots quite well, and opens opportunities for mixing your shots up on the go. While it’s not inexpensive at $1850, it uses the relatively inexpensive 60mm macro lens and port that many people already have. Adding up the cost of an expensive mid-range zoom lens, large glass dome port, extension, and gears, it’s a cost-effective and smaller solution that’s travel friendly.

For a high-quality general purpose, mid-range lens solution, it might be something to consider for your underwater rig. See more shots taken with a variety of lenses with the D850 on my Forgotten Islands trip here.

Monday, September 24, 2018

Shoot Video & Stills with the Olympus TG-5 & Kraken Hydra Lights

The Olympus TG-5 camera and housing packages have been very popular with a wide variety of divers. The camera shoots great stills as well as 4K video. It has Olympus PT-058 housing, or the Ikelite and Nauticam housings give protection to 140', 200' and 300' respectively.
underwater preset modes for snapshot, wide angle and other modes that make life easy. As well it has amazing macro modes that can let you shoot the small stuff with ease. All this in a rugged, camera that's drop proof, freezeproof, and water resistant to 50'. The

Having a lighting system that can shoot both stills and video gives the widest possible use of this great little camera. The new Kraken Hydra "S +" lights that now come in a 2500, 3500 and 5000 lumen models, as well as the popular Kraken Macro Ringlight 3000, all support a higher lumen output in a fast "burst" mode that saves power and gives a higher output for still photos. You connect up the camera to the light with a fiber optic cord and the onboard flash triggers the light.

The light is much brighter in "burst" mode, up to 7000 lumens on the Hydra 5000. However it still doesn't give the instant, super high intensity light that freezes the subject and gives high color saturation that a strobe can. But for general use where you want to shoot video and stills they are a great option.

The Kraken Hydra lights come with mounts, case and charger and feature a sealed light head against flood damage. Besides utilizing the burst mode you can also control them with a fiber optic connection to a handy remote control. Optical Ocean Sales has a wide selection of packages from single compact to complete dual "ultimate" systems that come with one or two lights, trays and wide angle lenses.

Setting up the TG-5 Camera  with Kraken Hydra Lights

The following set-up is for the Olympus TG-5 but also will work with most other cameras, however specific menu items and locations obviously will be different.

Setting the camera to the underwater scene modes works fine. However in underwater snapshot mode on the TG-5, there is no selection possible for fill flash. The other underwater modes do have that flash mode, and should pre-select it for you. If you need to adjust the camera exposure, you can use the +/- exposure compensation, or adjust your ISO. Do not use auto-ISO.

There is a manual flash mode on the TG-5 that will work in all modes. This may be the best idea, as you can turn the flash power down and just use it to trigger the strobe. To select manual flash mode, press the flash button, then select "Full", then press "Info" and turn the power down maybe to 1/20th (but not all the way) with the left/right arrow buttons. This will save your camera battery.

If you want more control over the camera, then use aperture priority or program modes. This is recommended for macro modes. Set the camera flash to fill or manual as above.

The Kraken light needs to be on, with the right button held down until it starts flashing. You can shoot stills or video in that mode from the white flood mode. You can also use the red or uv modes of the Kraken light and take "burst" white light flash stills. While in normal mode, push the left hand button on the light a few times to red or uv mode. Then hold down the right button until the colored indicator lights flashes, showing that the light is in burst mode. If you then press the right button, it will flash high intensity white, like a "test" button on a strobe, then switch back to red to use as a focus/target light. This is a good mode for night or around shy critters like squid, crabs, octopus, etc.

Press and hold the left hand button sleeps the light. Holding both buttons down turns it off.

Translate